Playwright Component Testing: Best Practices for React, Angular, Solid, & Svelte
Component testing is a subcategory of unit testing. Component tests validate the functionality of individual components and modules. They help developers with the early detection of bugs and verify that each part works independently before integrating it into a larger system.
Playwright is an end-to-end testing framework in the Node.js ecosystem. It uses emulation to render a web browser and performs automated actions in that browser. It supports component testing for modern web frameworks like React, Solid, Svelte, and Vue. Key advantages of Playwright over other popular testing frameworks for component testing include:
- Cross-browser testing- Run tests across Chromium, Firefox, and WebKit to ensure the component functions well across platforms.
- Isolated test environments- Each test runs in a sandbox environment, preventing interference from other tests.
- Visual regression testing- Capture and compare screenshots to detect inconsistencies or UI changes.
- Network interception- Built-in Playwright functionality allows mocking and modifying network requests to simulate backend responses.
- Parallel test execution: Run tests in parallel across multiple workers or browsers that significantly reduce test execution time.
This tutorial will provide step-by-step instructions for Playwright component testing, from configuration through running our first tests. Readers can expect to learn the fundamentals of component testing with Playwright through hands-on practice, including creating a React app, writing component tests encompassing diverse features while following best practices, and exploring advanced topics like the inner workings of Playwright. We will also introduce a novel AI tool that generates full Playwright test scripts by analyzing the user interface.
Summary of key Playwright component testing concepts
The table below summarizes the Playwright component testing steps and concepts this article will explore in more detail.
How to perform Playwright component testing on a React web application
In this tutorial, we will create a small React application with two buttons and an input field. One of the buttons will display the text in the input field, while the other will fetch a joke from an external API. We will utilize the same application to perform component testing with Playwright.
Prerequisites
- Node.js (v14 or higher): Check that Node.js is installed
- npm or yarn: A package manager for installing dependencies.
Note: You can use Node Version Manager(NVM) to manage or install various versions of nodes within your system.
Step 1: Set up the React application
The steps below configure and run the React application that we will use for testing.
Create a new Vite project
Run the following command to create a new Vite project:
$ npx create-vite@latest component-testing-playwrightWhen prompted to select a framework and language -
- Select React for the framework
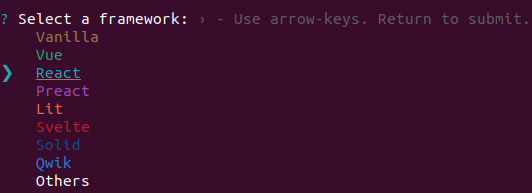
- Select your preferred Javascript variant. For our tutorial, we will use classic Javascript

{{banner-large-dark-2="/banners"}}
Copy the project files
We will add two new components to the project: Button.jsx and TextHandler.jsx. The TextHandler component will handle user input and display text, whereas the Button component will fetch jokes from an API. Here’s what the project structure looks like:
src
 ┣ assets
 ┃ ┗ react.svg
 ┣ components
 ┃ ┣ Button.jsx
 ┃ ┣ TextHandler.jsx
 ┣ App.css
 ┣ App.jsx
 ┣ index.css
 ┗ main.jsx
Button.jsx component
The Button.jsx component is a reusable button that can trigger different actions depending on the props passed to it. It takes two callbacks: onClick and fetchJoke, and a label prop.
Render a button that fetches a joke when clicked:
// src/components/Button.jsx
import PropTypes from "prop-types"

const Button = ({ onClick, label, fetchJoke, ...props }) => {
	const handleClick = async () => {
		if (fetchJoke) {
			const joke = await fetchJoke()
			onClick(joke)
		} else {
			onClick()
		}
	}

	return (
		<button
			onClick={handleClick}
			{...props}
		>
			{label}
		</button>
	)
}

Button.propTypes = {
	onClick: PropTypes.func.isRequired,
	label: PropTypes.string.isRequired,
	fetchJoke: PropTypes.func,
}

export default Button
TextHandler.jsx Component
The TextHandler.jsx component uses the Button component to perform two actions: display the input text on the screen or fetch a random joke from the external API.
Display a text input field, and call the API when the fetch joke button is clicked:
// src/components/TextHandler.jsx
import { useState } from "react"
import Button from "./Button"

const TextHandler = () => {
	const [joke, setJoke] = useState("")
	const [inputText, setInputText] = useState("")
	const [displayText, setDisplayText] = useState("")

    // Function to fetch a random joke from the API
	const fetchJoke = async () => {
		const response = await fetch(
			"https://official-joke-api.appspot.com/jokes/random"
		)
		const data = await response.json()
		const fetchedJoke = `${data.setup} - ${data.punchline}`
		setJoke(fetchedJoke)
		return fetchedJoke
	}

	const handleDisplayText = () => {
		setDisplayText(inputText)
		setInputText("")
	}

	return (
		<div style={{ textAlign: "center", margin: "20px" }}>
			<input
				value={inputText}
				onChange={(e) => setInputText(e.target.value)}
				placeholder='Type something...'
				data-testid='text-input'
				style={{ padding: "8px", marginRight: "5px" }}
			/>
			<Button
				onClick={handleDisplayText}
				label='Display Text'
				data-testid='display-text-button'
				style={{ marginRight: "5px" }}
			/>
			<Button
				onClick={() => {}}
				label='Fetch Joke'
				fetchJoke={fetchJoke}
				data-testid='fetch-joke-button'
			/>

			{displayText && (
				<p
					data-testid='display-text'
					style={{ marginTop: "10px" }}
				>
					{displayText}
				</p>
			)}
			{joke && (
				<p
					data-testid='display-joke'
					style={{ marginTop: "10px" }}
				>
					{joke}
				</p>
			)}
		</div>
	)
}

export default TextHandler
App.jsx Component
Now, we will add the TextHandler component to the root component to reflect the changes in the UI. Replace the content of App.jsx with the following code.
// src/App.jsx
import TextHandler from "./components/TextHandler"
import "./App.css"

function App() {
	return (
		<div id='root'>
			<h1>Playwright component testing</h1>
			<TextHandler />
		</div>
	)
}

export default App
Run the application
Run the following command to install the dependencies:
$ npm installor
$ yarn installAfter installing the dependencies, start the application using one of these commands:
$ npm run devor
$ yarn devHere’s a glimpse of what the application looks like:
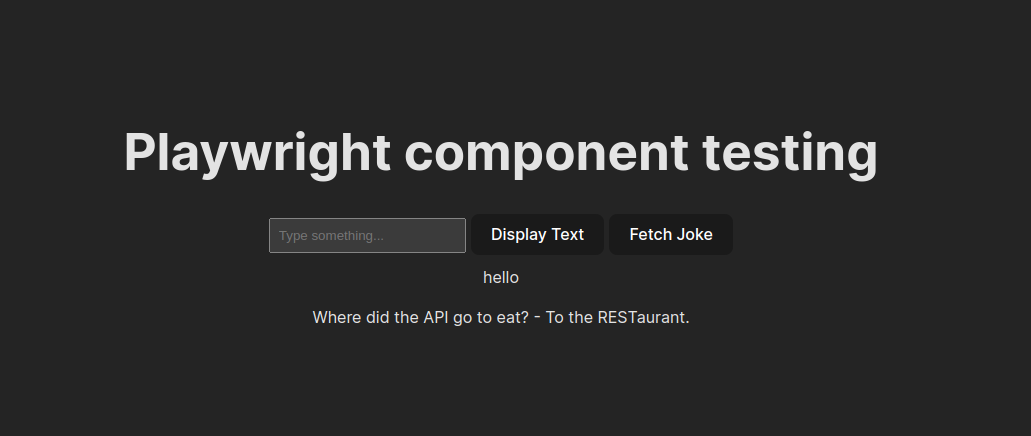
Note: This article focuses on component testing, so we will utilize the default CSS provided by Vite, but feel free to customize the application to suit your preferences.
Step 2: Install Playwright component testing dependencies
Playwright provides a library @playwright/experimental-ct-react designed specifically for component testing. It is similar to @playwright/tests package but equipped with some component testing-specific fixtures and implementations.
To initialize Playwright component testing in the existing project, run the following command:
$ npm init playwright@latest -- --ctor
$ yarn create playwright --ctWhen prompted during the Playwright setup, select JavaScript as the programming language and React 18 as the framework. Follow the prompts to install browsers and other operating system-specific dependencies.
Upon successful execution of the command, you’ll notice that Playwright creates the following three files in your project structure:
component-testing-playwright
 ┣ playwright
 ┃ ┣ index.html
 ┃ ┗ index.jsx
 ┗ playwright-ct.config.js
Let’s break down what each of these files are:
- playwright/index.html - This file serves as an entry point for Playwright component testing. It is used to render components during testing.
- playwright/index.jsx - This file acts as another entry point for Playwright component testing. Any runtime dependencies that the component requires like CSS files or additional scripts can be imported here. Below we import the CSS files necessary for our project:
// Import styles, initialize component theme here.
import "../src/index.css"
import "../src/App.css"- playwright-ct.config.js - This is a default configuration file for Playwright with some additional features for component testing like ctPort , which designates a port for Playwright component endpoint. Similar to standard UI testing, Playwright fully supports cross-browser testing for component testing.
The cross-browser feature can be configured by defining projects property in the Playwright configuration file:
// playwright-ct.config.js
{
...
projects: [
		{
			name: "chromium",
			use: { ...devices["Desktop Chrome"] },
		},
		{
			name: "firefox",
			use: { ...devices["Desktop Firefox"] },
		},
		{
			name: "webkit",
			use: { ...devices["Desktop Safari"] },
		},
	],
}
Playwright also automatically adds the following script in package.json that will be used to run the tests:
{
. . .  ,
"scripts": {
    . . . ,
    "test-ct": "playwright test -c playwright-ct.config.js"
  }
}
Vite uses the ES module by default, while Playwright initializes in CommonJS. Transitioning our Playwright setup to the ES module is important since we want to maintain a consistent module system within the project. This will allow us to use modern JavaScript features, like import statements, within the Playwright file. For more information on this topic, refer to this documentation.
To maintain compatibility with ES modules, update your playwright-ct.config.js file. Change the existing code from:
// @ts-check
const { defineConfig, devices } = require('@playwright/experimental-ct-react')

/**
 * @see https://playwright.dev/docs/test-configuration
 */
module.exports = defineConfig({
to the following format:
// @ts-check
import { defineConfig, devices } from "@playwright/experimental-ct-react"

/**
 * @see https://playwright.dev/docs/test-configuration
 */
export default defineConfig({
In your eslint.config.js file, add the following code inside the env block:
env: {
	    node: true,
	},
This specifies that the code is expected to run in the Node.js environment and node-specific global variables like process, module, etc. aren’t flagged by ESLint as undefined.
Step 3: Write component tests
We will start by writing our first component test to verify that the component renders correctly based on the provided props. Create a file Button.spec.jsx alongside the component being tested i.e. Button.jsx . Playwright automatically detects .spec files as test files. Since React components are usually rendered to the DOM using JSX, our test file will do the same.
Add the following code to the Button.spec.jsx file, to render the component in the test environment:
// src/components/Button.spec.jsx
import { test, expect } from "@playwright/experimental-ct-react"
import Button from "./Button"

test.describe("Button", () => {
	test("it renders", async ({ mount }) => {
		// Mount the 'Button' component with props
		const component = await mount(
			<Button
				onClick={() => {}}
				label='test component'
				fetchJoke={() => {}}
			/>
		)

		// Assert that the Button contains the label "test component"
		await expect(component).toContainText("test component")
	})
})
Let’s break down what we did here:
- Import relevant packages: We started by importing test and expect from @playwright/experimental-ct-react package. The test function defines tests, while expect is used for assertions. We also imported Button, which is the component we are testing.
- Define test: The test case is named “it renders” and created using the test function. The mount fixture renders the component in an isolated environment.
- Mount component: The mount function, specifically designed for component testing, accepts JSX element as an argument and returns a promise. Here, we pass Button component directly into mount function, allowing it to render the component within the test environment. Since we are testing the render functionality, we provide empty callback functions for the onClick and fetchJoke props and label props set to “test component”.
- Assertion: After mounting the component, we use expect function to assert that the rendered Button component contains the text “test component” as passed through the prop.
Now, let’s run the test. Tests can be executed through VSCode Playwright extension or directly from the terminal. Playwright supports both headed and headless modes for running tests.
{{banner-small-3="/banners"}}
Headless mode
Headless mode streamlines test execution by running the browser without a visual interface. This results in faster test cycles and reduced resource consumption, making it ideal for CI/CD environments. To execute the test in headless mode, run the following command: (note that Playwright runs tests in headless mode by default)
$ npm run test-ctor
$ yarn test-ctThe test should pass, and your output should look similar to this:
> component-testing-playwright@0.0.0 test-ct
> playwright test -c playwright-ct.config.js


Running 3 tests using 3 workers
  3 passed (2.8s)

To open last HTML report run:

  npx playwright show-report
We added a single test here, but the output states three tests passed. Why? Because Playwright executed the test on three browsers: Chromium, Firefox, and WebKit.
Headed mode
In headed mode, tests run the browser with UI rendered, allowing us to observe the real-time test execution. While this approach can be time-consuming, it’s highly effective when debugging test failures. There are two ways to run tests in headed mode:
- Setting the “headless” property to false in the Playwright configuration file:
// playwright-ct.config.js
...
{
	use: {
           ...
		ctPort: 3100,
		/* Run tests in headed mode */
		headless: false
	},
}- Running tests in debug mode is a more efficient way to observe live test execution Use the following command to execute tests in debug mode:
$ npm run test-ct -- --debug$ yarn test-ct -- --debug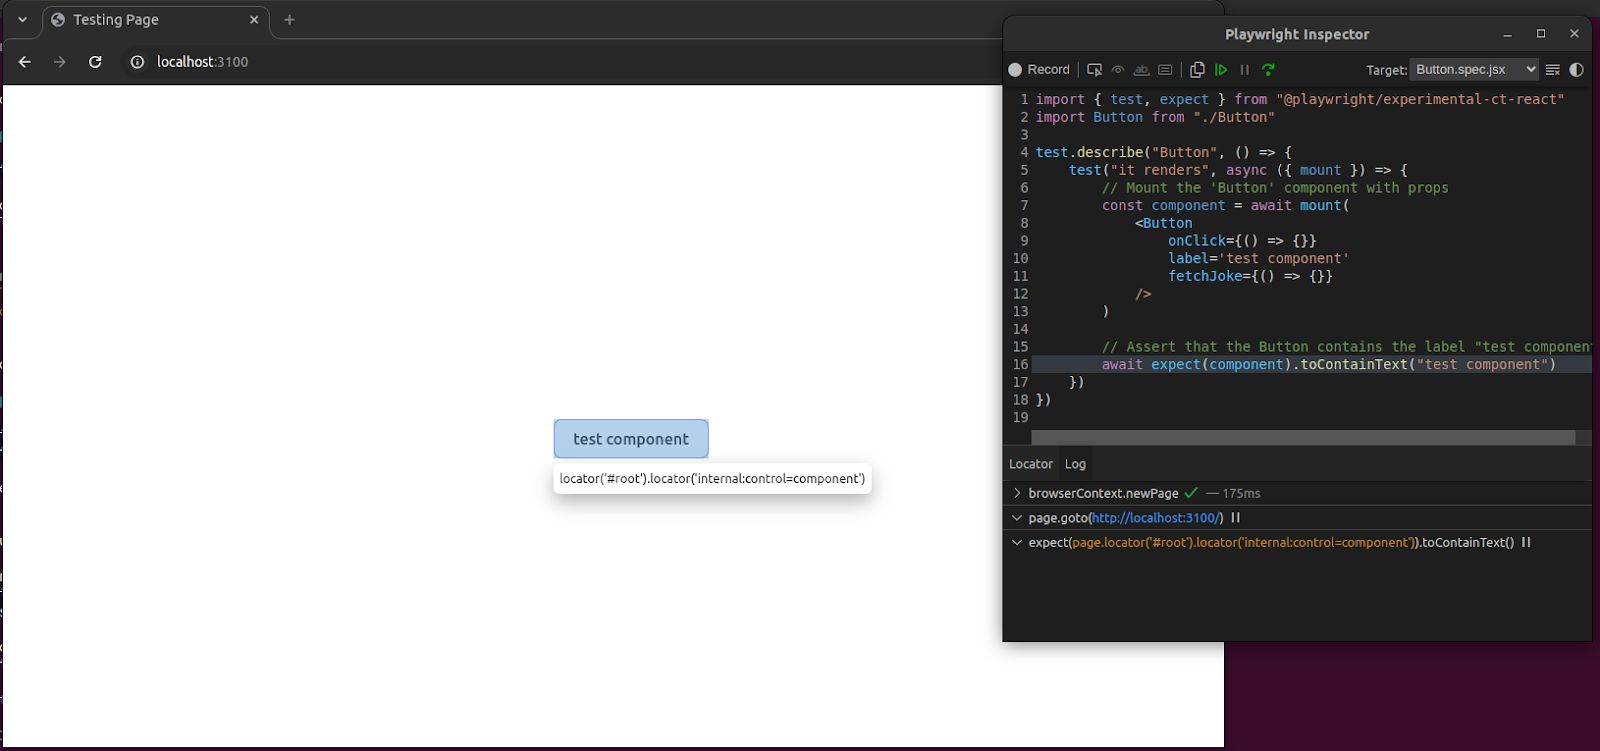
$ npx playwright show-report Step 4: Component interaction testing
With our component testing environment established, we can now test user interactions. Interaction testing is important to verify that the components respond as expected to user actions like clicks, text inputs, and other events, reinforcing reliable functionality and an engaging user experience.
Create another test file TextHandler.spec.jsx and add the following code:
// src/components/TextHandler.spec.jsx
import { test, expect } from "@playwright/experimental-ct-react"
import TextHandler from "./TextHandler"

test.describe("Onclick button", () => {
	test("displays text", async ({ mount }) => {
		// Mount the 'TextHandler' component
		const component = await mount(<TextHandler />)

		// Fill the input with "hello world"
		await component.getByTestId("text-input").fill("hello world")

		// Simulate clicking the button
		await component.getByTestId("display-text-button").click()

		// Assert that the displayed text is "hello world"
		await expect(component.getByTestId("display-text")).toHaveText(
			"hello world"
		)
	})
})
In the example above, we mounted the TextHandler component, filled the text input with “hello world” and simulated a button click to verify that the input text “hello world” will be displayed on the screen when the Display Text button is clicked.
Run the test with the same command:
$ npm run test-ctor
$ yarn test-ctStep 5: Handling network isolation
While testing front-end components, isolating the network calls is a best practice, whether those calls are to external API’s or some internal services. The unpredictable and dynamic nature of real network calls makes it challenging to pass tests consistently. By mocking endpoints, we create a stable and reliable environment, ensuring our components work seamlessly with the backend. Network Isolation is vital while testing because it promotes faster development cycles, simplifies the testing process, and reduces the dependencies on external services.
To handle and intercept network requests Playwright provides an experimental router fixture. The router fixture can be used in two ways:
- router.route(url, handler): This functions similarly to page.route()
- router.use(handlers): This method allows us to pass MSW library request handlers to mock API requests
To implement network interception using Playwright's router.route, we’ll add a new test to our TextHandler.spec.jsx file.
This test will mock a network call to https://official-joke-api.appspot.com/jokes/random. The mocked response body contains a joke, replicating the structure of what the actual API would send.
When the test clicks the Fetch Joke button, Playwright’s router intercepts the call and returns the response instead of sending it to the real API. We will then assert that the displayed text matches the text we defined in the mock response.
Mount the component and perform the test like so:
// src/components/TextHandler.spec.jsx
test("fetched joke", async ({ mount, router }) => {
		// Mocking the API response
		await router.route(
			"https://official-joke-api.appspot.com/jokes/random",
			(route) => {
				route.fulfill({
					status: 200,
					contentType: "application/json",
					body: JSON.stringify({
						type: "programming",
						setup: "Why did the programmer bring a broom to work?",
						punchline: "To clean up all the bugs.",
						id: 446,
					}),
				})
			}
		)

		// Mount the component and perform interactions
		const component = await mount(<TextHandler />)

		// Simulate a button click to fetch a joke
		await component.getByTestId("fetch-joke-button").click()

		// Verify that the joke is displayed correctly
		await expect(component.getByTestId("display-joke")).toHaveText(
			"Why did the programmer bring a broom to work? - To clean up all the bugs."
		)
	})
Run the test with the same command:
$ npm run test-ctor
$ yarn test-ctStep 6: Perform screenshot testing
Visual regression testing is a crucial part of software testing to ensure visual consistency in the application after changes in the codebase. Screenshot testing is a visual regression testing technique that helps detect UI anomalies by comparing screenshots across different builds. Benefits of screenshot testing include:
- Early detection of visual regressions: Visual regression testing helps identify subtle, unintended UI changes introduced by codebase changes.
- Ensuring visual consistency: Testing across browsers and devices helps to confirm that the application's look remains consistent universally.
- Automated visual verification: Visual comparison reduces time spent on manual checks, saving time and money costs.
To implement screenshot testing with Playwright we’ll create a new file App.spec.jsx and take a screenshot of App component. Here’s the test code:
// src/App.spec.jsx
import { test, expect } from "@playwright/experimental-ct-react"
import App from "./App"

test.describe("App", () => {
	test("compare screenshot", async ({ mount }) => {
		// Mount the 'App' component
		const component = await mount(<App />)
		await expect(component).toHaveScreenshot()
	})
})
In the code snippet, we mounted the component App, then used toHaveScreenshot method to take the screenshot of the component and assert it with the baseline image.
Run the test with the same command:
$ npm run test-ctor
$ yarn test-ctOn the first run, the test will fail because Playwright will create a baseline screenshot for future comparisons. You will notice a new folder is created on your project that contains the baseline screenshots:
__snapshots__
 ┗ src
 ┃ ┗ App.spec.jsx-snapshots
 ┃ ┃ ┗ App-compare-screenshot-1-chromium-linux.png
From the second run onward, Playwright will compare the current screenshot against the saved baseline. Any visual differences between the current and baseline screenshots will cause the test failure. For instance, if you change the App component or any nested components (like changing the title, button labels, or styles), Playwright will detect the mismatch and mark it as a failure.
For intended changes, the snapshots can be updated with the following command:
npm run test-ct -- -uor
yarn test-ct -uOne limitation of Playwright’s screenshot testing is that it simply flags pixel mismatches without giving insights on where or why the error occurred. This is where Qualiti.ai comes in handy. With AI-powered visual analysis, Qualiti scans and analyzes screenshots, videos, or live application feeds, detecting visual anomalies, layout inconsistencies, and functional issues. It directly notifies the developers about the issues, giving them a detailed view of the problems that negatively impact the user experience. This prevents the hassle of manually inspecting screenshots to detect the cause behind the test failure.
The internals of Playwright component testing
Playwright identifies components to test by searching for mount functions and creating a list, which is then bundled and served by Vite. When the mount is called, Playwright navigates to the facade page /playwright/index.html and instructs the page to render the specific component to be tested.
Playwright makes use of both Node.js and the browser to test components. This means the component runs in the real browser environment, simulating user interactions. Similarly, the test scripts run in a Node.js environment, allowing the developer to leverage Node.js capabilities. Due to this unique blend, Playwright allows parallel test execution and debugging capabilities like trace reports for component testing. While this feature is exciting, it comes with its limitations:
- Complex live objects cannot be passed directly to the testing components. Only plain JavaScript objects and basic types like strings and numbers are supported.
In the code below, a simple plain JavaScript object is passed so Playwright can send this to the browser, and it works.
test("this will work", async ({ mount }) => {
	const component = await mount(
		<UserProfile user={{ name: "John", age: 30 }} />
	)
})test("this will not work", async ({ mount }) => {
// `user` is a Map object, which Playwright cannot pass to the browser environment.
const user = new Map([["name", "John"],["age", 30]])
const component = await mount(<UserProfile user={user} />)
})- Passing data to the component synchronously in a callback is not supported.
In the following snippet, callback ()=>’John’ lives in the Node environment. When UserProfile component calls the nameGetter function from the browser context, it won’t get the result synchronously because it needs to be awaited for the correct value to be returned.
test("this will not work", async ({ mount }) => {
	const component = await mount(<UserProfile nameGetter={()=> 'John'} />)
})
A workaround for this problem is writing test stories and creating a wrapper of a component specifically for testing. This will overcome the limitation and provide an abstraction for tests, allowing developers to customize their testing environment.
Six Playwright component testing best practices
While component testing is essential for ensuring applications work as intended, incorporating certain best practices can accelerate testing and make test suites more maintainable and scalable.
- Utilize beforeMount and afterMount hooks
beforMount and afterMount hooks are an effective way of setting up and tearing down the application. In more complex applications, extra setup might be necessary for initializing mock data, configuring the state, or preparing the environment. Placing these steps in separate functions prevents repetitiveness, ensuring cleaner and maintainable tests. - solate components
While testing, isolating components to check interference from other components, services, or APIs is essential. Testing components in isolation builds confidence in the functionality of the specific components that contribute to reliable and accurate test results. Additionally, it helps narrow down the bug in case of test failure. - Mock external dependencies and network calls
External APIs, services, and network calls introduce unpredictability in the tests, making it challenging to achieve consistent and reliable tests. Mocking these dependencies allows us to control their behavior, resulting in stable test suites. - Integrate tests into the CI/CD environment
To avoid and catch regression quickly, it’s essential to integrate tests in a CI/CD environment. Test integration in CI/CD environments can help detect bugs early, speed up development, and build stable applications. Tools like GitHub Actions, Jenkins, and Travis CI can incorporate Playwright tests into CI/CD pipelines. These tools can be configured to run on different environments, ensuring that any changes introduced to the codebase are validated immediately.
For instance, when a developer pushes new code or opens a pull request, CI/CD automatically triggers the test suite. This allows tests to detect regression early on, preventing any potential bug from reaching the production environment. - Perform cross-browser testing
Cross-browser testing assures that your application runs as expected across different modern browsers. Testing applications across multiple browsers provides much additional coverage since different browsers might render components differently.
For example, different browsers might interpret CSS styles differently, or an application might load faster in Safari but take longer in Firefox due to different rendering engines. HTML5 form might look different cross-browser and might show different validation errors. The application might be responsive in one but unresponsive in another. These are a few problems that cross-browser testing will help detect early, and developers can make applications compatible with all modern browsers. - Leverage low-code/no-code tools to enhance collaboration
Use tools like Qualiti, a generative AI-powered software solution for test automation that natively supports Playwright to generate customizable test scripts. As explained previously, it is also an excellent tool for performing visual analysis.
Autonomous test generation with Qualiti
Qualiti’s test generation is powered by its ability to analyze the structure and content of web pages, autonomously creating test steps based on Playwright’s page inspection and tracing data. This approach reduces the need for manual input, allowing teams to rapidly create accurate and comprehensive test suites directly from the application’s UI structure and behaviors.
Let’s see an example of what a full workflow might look like in production.
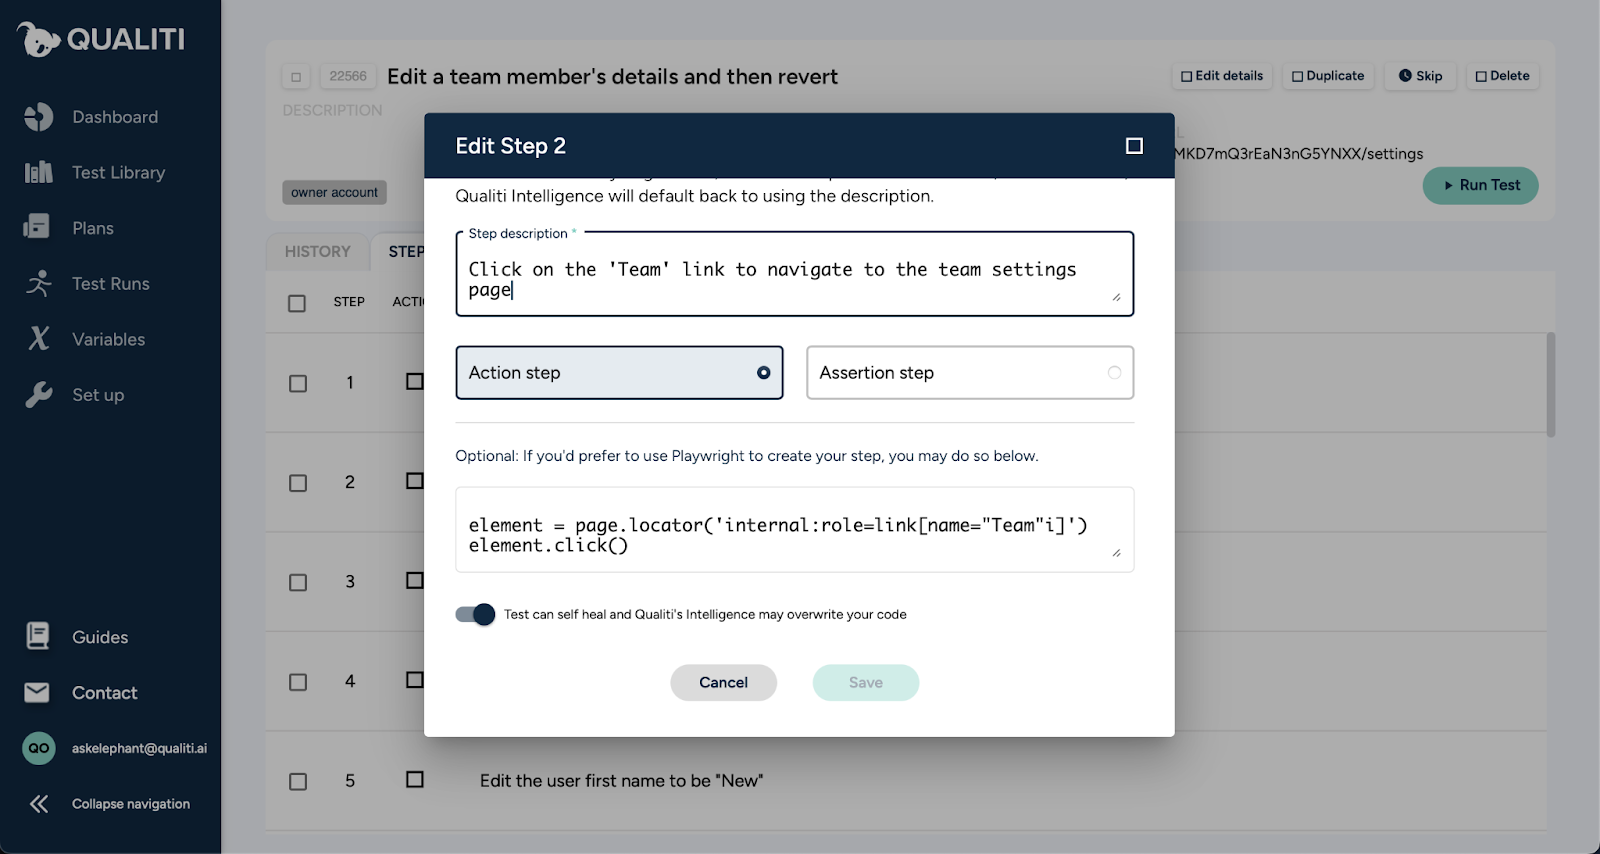
Here, Qualiti automatically generates a step to navigate to the "Team" settings page by analyzing the page’s structure and detecting interactive elements. Qualiti uses Playwright’s inspection tools to locate and identify the "Team" link, creating a step that clicks the link to reach the team settings page. No manual coding or prompts are required—the AI automatically detects the element and generates the correct interaction.
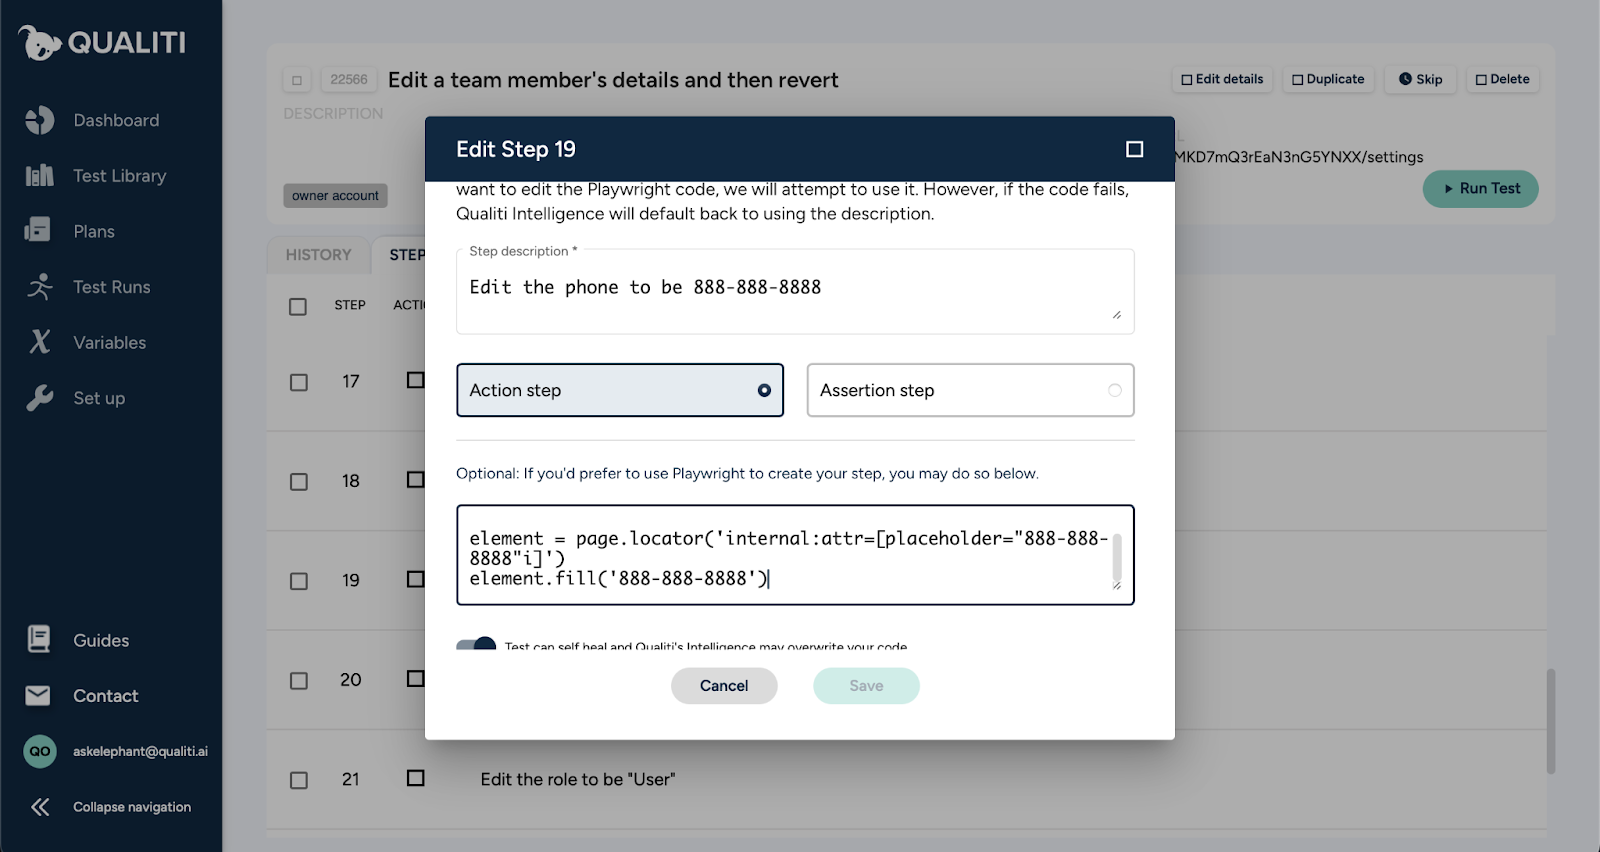
Qualiti’s platform identifies fields based on attributes and generates the code to input specific values for steps that involve updating user information, like changing a phone number. In this case, Qualiti’s analysis recognized the phone number field and automatically prepared a step to enter "888-888-8888."
This process uses page traces and field identifiers without requiring users to define each action manually for fast and efficient test generation.
{{banner-small-4="/banners"}}
Last thoughts
Playwright’s component testing features leverage Node.js and browser emulation to render end-to-end testing using dynamic application components. This allows components to render in a real browser and accurately simulate user interactions. The Node.js engine powers test execution and provides extra functionalities like parallel testing and test report generation. Modern component-based frameworks like React, Vue, Svelte, and Solid can be tested continuously across web browsers.
Following best practices like those described in this article, Playwright's component testing capabilities can form the foundation for a scalable and maintainable test suite.


